
Configure your DB Schenker shipping service in AtomicSeller: access details, API version, default service, label format and default sender.
1. Open the settings #
Open Shipping services, then double-click the DB Schenker service to configure. Keep your carrier account details ready. The Demo values shown below are fictitious.
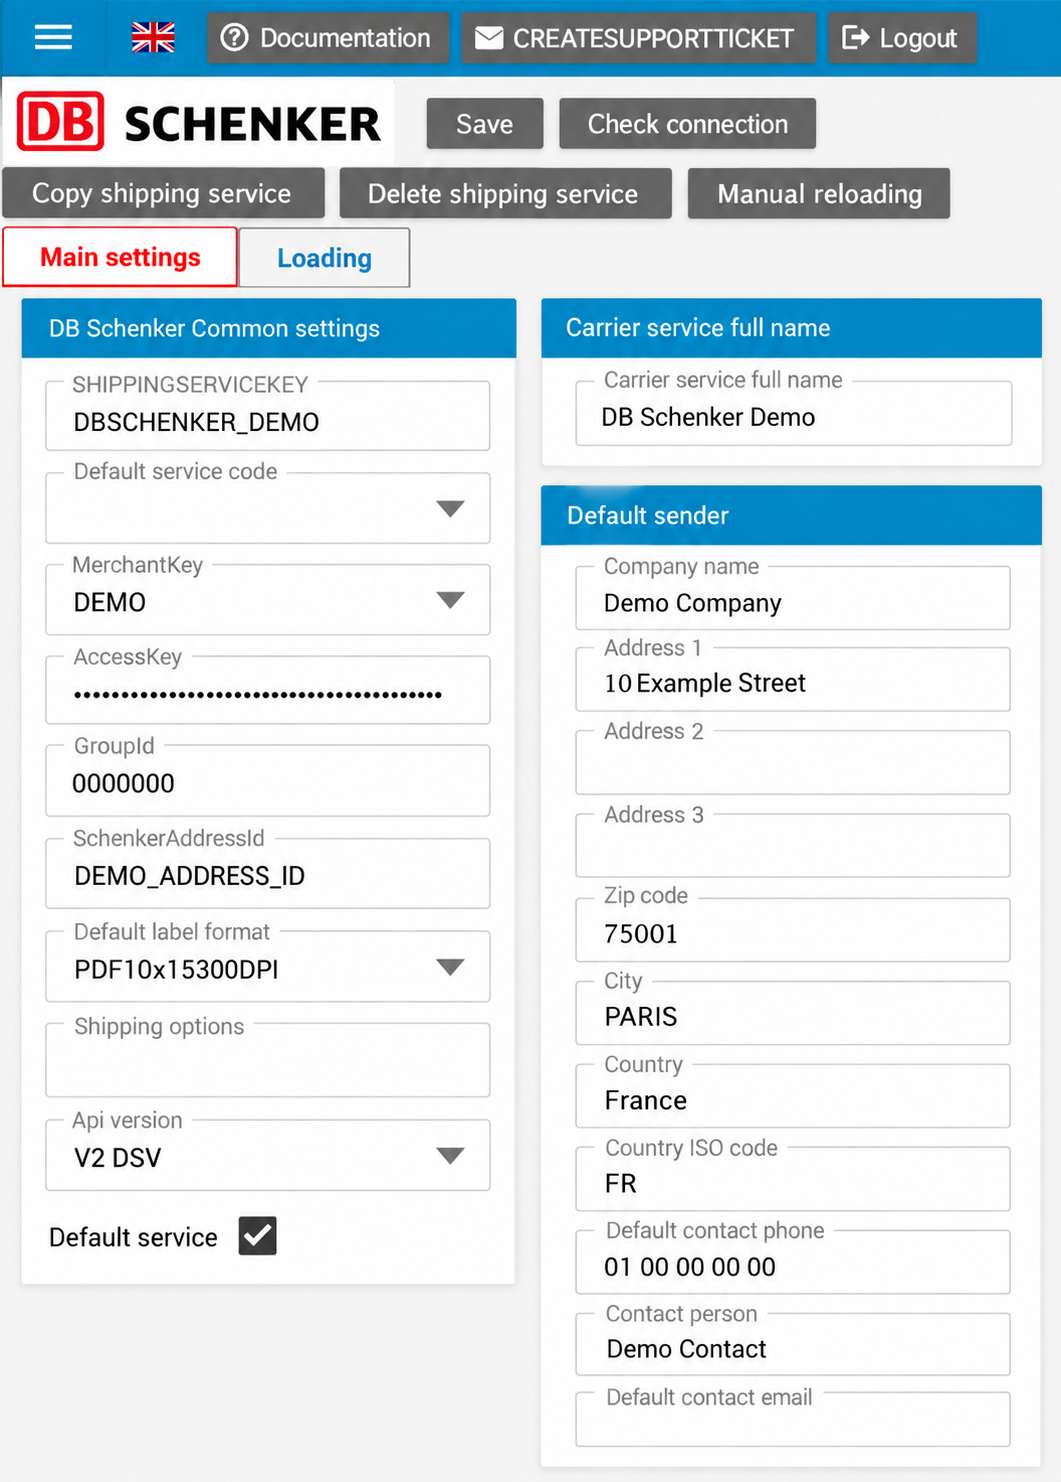
2. Enter the account and service settings #
| Field | What to enter |
|---|---|
| SHIPPINGSERVICEKEY | Code identifying the service in AtomicSeller. Use a recognisable code; keep an existing service code until its mappings have been checked. |
| MerchantKey | Merchant to associate with the service. Available choices depend on the merchants in your account. |
| Carrier service full name | A name that helps identify the service in your organisation. |
| AccessKey | Access key supplied for your carrier connection. This field is masked; do not publish its value or include it in a support ticket. |
| GroupId | Group identifier associated with your connection. Copy the value supplied for your account. |
| SchenkerAddressId | Address identifier supplied for your carrier account. This field is separate from the postal address entered under Default sender. |
| Api version | The list offers V1 DBSchenker and V2 DSV. Select the version matching the credentials supplied to you; do not change versions based solely on the service’s commercial name. |
| Default service code | Default service. Select the code appropriate for your contract and workflow. An option appearing in the menu does not guarantee that it is enabled on your account. |
| Default label format | Label format suited to your printer and supported by your carrier connection. |
| Shipping options | Text field for connection options. Use only values confirmed for your configuration; this is not a dropdown. |
| Default service | Select this checkbox if the service should be designated as the default in your configuration. |
3. Choose the service and label format #
The following choices are reproduced as displayed in the application. French product names are retained to help you locate them. A blank entry is shown as “(blank)”; confirm the required value before leaving a setting unspecified.
Default service code #
- (blank)
- SYSTEM France (01)
- PALLET France (08)
- WECARE France (10)
- PREMIUM 13 France (12)
- PREMIUM France (13)
- PREMIUM 10 France (14)
- PALLET PREMIUM France (18)
- PREMIUM Home (19)
- Pharma+ System (21)
- PHARMA+ PREMIUM 13 France (22)
- PHARMA+ PREMIUM France (23)
- PHARMA+ PALLET France (24)
- EXPRESS France (30)
- SYSTEM Export (60)
- PREMIUM 13 Export (62)
- PREMIUM Export (63)
- FIX DAY Export (64)
- PREMIUM 10 Export (66)
- PREMIUM Home Export (69)
- DIRECT France (80)
- DIRECT Export (81)
- Premium Import (73)
- Premium Import 10 (74)
- Premium 13 Import (72)
Default label format #
- PDFA4300dpi
- PDF10x15300DPI
- ZPL10x15203dpi
- ZPL10x15300dpi
- ZPL10x10203dpi
- ZPL10x10300dpi
- DPL10x15300dpi
- DPL10x15203dpi
- DPL10x10203dpi
- DPL10x10300dpi
Api version #
- V1 DBSchenker
- V2 DSV
PDF10x15300DPI identifies a 10 × 15 cm PDF at 300 dpi for a dedicated label printer; PDFA4300dpi is the A4 PDF choice. ZPL and DPL formats require a compatible printing workflow. Confirm support for the chosen format with your carrier connection.
4. Complete the default sender #
Enter the default sender under Default sender. These details are intended for use when no sender is supplied in the order or through the API. The screenshot is an example, not a set of recommended values.
| Field | What to enter |
|---|---|
| Company name | Sender company. |
| Address 1 | Street number and name. |
| Address 2 / Address 3 | Additional address details, if needed. |
| Zip code / City | Postal code and city. |
| Country / Country ISO code | Country and two-letter country code, for example France and FR. |
| Default contact phone | Sender contact phone number. |
| Contact person | Sender contact name. |
| Default contact email | Sender contact email address. |
5. Save and check the connection #
Use Save to save the settings and Check connection to run the available connection check. If an error appears, check the access details, API version and selected service. Send the exact error message to AtomicSeller support if needed, without including the AccessKey.
6. The Loading tab #
The Loading tab displays a loading history table with Create timestamp, Close timestamp, Batch status and ENDOFDAYPDF. It may be empty when no records are available.
A Manual reloading button is also present. Its operational use is separate from entering account settings; use it according to the procedure confirmed for your workflow.