
Configure your GLS account in AtomicSeller: credentials, service, label format and default sender.
1. Open the settings #
Open Shipping services, then double-click the GLS service you want to configure. Have the credentials and codes supplied for your carrier account ready. The Demo values below are fictional.
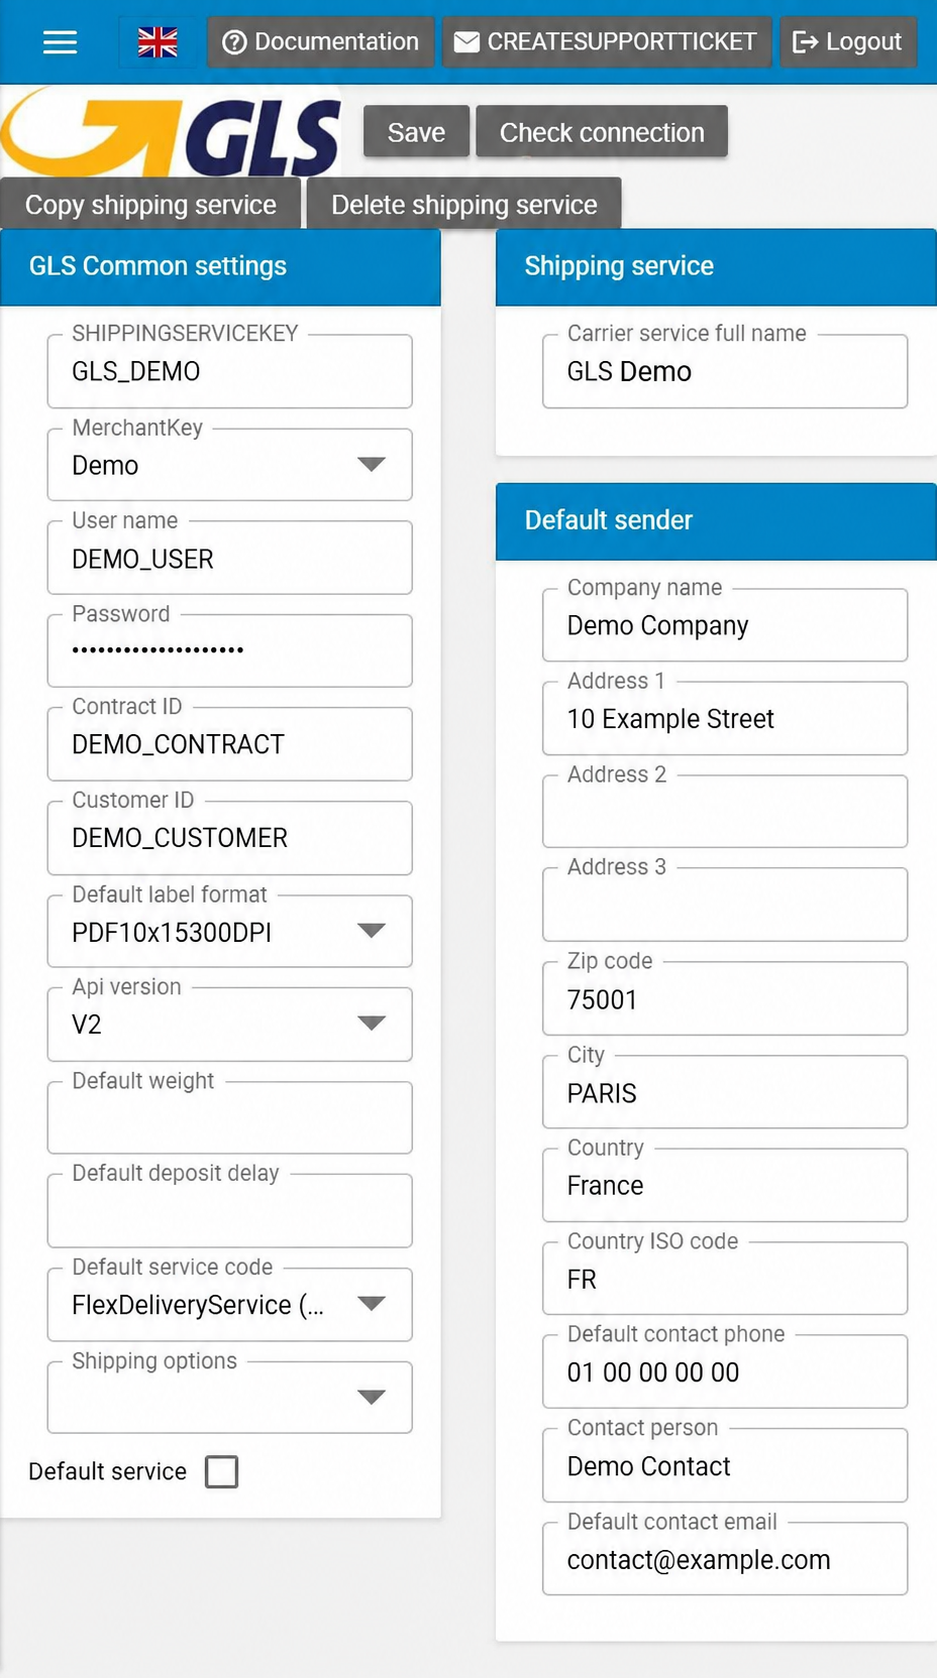
Screenshot edited to anonymise account data. Labels match the English interface. The values shown are examples, not settings to copy.
2. Enter the account and service details #
| Field | What to enter |
|---|---|
| SHIPPINGSERVICEKEY | Code identifying this service in AtomicSeller. Use a recognisable code; before changing an existing code, check its mappings in your orders and integrations. |
| MerchantKey | Merchant associated with the service. Available choices depend on the merchants created in your account. |
| Carrier service full name | Name used to recognise the service within your organisation. |
| User name | GLS login supplied for your integration. |
| Password | Password associated with this GLS connection. |
| Contract ID | GLS contract identifier. Enter the value supplied for your account. |
| Customer ID | GLS customer identifier, separate from the Contract ID. |
| Api version | Version used by your connection: V1 or V2. Select the version confirmed for your account; the example is not a general recommendation. |
| Default label format | Label format suited to your printer and supported by your connection. See the choices below. |
| Default weight | Default weight. Confirm the unit and when this value applies to your connection before entering a value. |
| Default deposit delay | Default deposit delay. Use the value confirmed for your workflow; do not infer its unit from the label alone. |
| Default service code | Default service matching your contract and shipments. A choice appearing in the menu does not guarantee that it is enabled for your account. |
| Shipping options | Connection options listed below. |
| Default service | Select this checkbox if this service should be the default service in your configuration. |
3. Choose the service and label format #
The choices below reproduce the exact application labels. “(blank)” means an empty entry. Select the service intended for your account; if unsure, confirm the choice with the carrier or AtomicSeller support.
Default service code #
- (blank)
- FlexDeliveryService (FDS)
- ShopDeliveryService (SHD)
- ShopReturnService (SRS)
- Pick&ShipService (P&S)
- Pick&ReturnService (P&R)
- ExpressParcelGuaranteed (EPG)
- PharmaService (MED)
- PharmaService+ (MDX)
- Global Express Parcel (GEP)
- Business Parcel (BPA)
Default label format #
- PDFA4300dpi
- PDF10x15300DPI
- ZPL10x15203dpi
- ZPL10x15300dpi
- ZPL10x10203dpi
- ZPL10x10300dpi
- DPL10x15300dpi
- DPL10x15203dpi
- DPL10x10203dpi
- DPL10x10300dpi
PDF10x15300DPI: a 10 × 15 cm PDF label at 300 dpi, suited to professionals using a printer for self-adhesive labels.
PDFA4300dpi: an A4 PDF suited to printing on A4 sheets, particularly for individuals or beginners. For a return label intended for an individual, choose a format their printer can handle and the return service supports.
The other choices serve more specific professional needs. ZPL and DPL require compatible equipment or a compatible printing workflow; the dimensions and resolution appear in the label. Check that your carrier connection supports the chosen format.
Api version #
- V1
- V2
Shipping options #
- (blank)
- IGNORERELAYNUMBERERRORS
Leave this setting unchanged unless a specific option has been agreed for your connection. IGNORERELAYNUMBERERRORS is an advanced option: enable it only on the instructions of AtomicSeller support for your workflow.
MerchantKey #
This dropdown contains the merchants in your account. Select the relevant merchant. Merchant names from the account used for the screenshot are not reproduced in this documentation.
4. Complete the default sender #
Enter the default sender’s details in Default sender. They will be used when no sender is provided in the order or through the API.
| Field | What to enter |
|---|---|
| Company name | Sender’s company. |
| Address 1 | Street number and name. |
| Address 2 / Address 3 | Additional address details, if needed. |
| Zip code / City | Postal code and city. |
| Country / Country ISO code | Country and two-letter country code, for example France and FR. |
| Default contact phone | Sender contact’s phone number. |
| Contact person | Sender contact’s name. |
| Default contact email | Sender contact’s email address. |
5. Save and check the connection #
Click Save to save the settings, then Check connection to run the check provided by the application. If an error occurs, check the credentials, API version, service and account details. If needed, send the exact error message to AtomicSeller support without including the password.