
Choose an editor and browse the other guides
The Advanced LOGISTICS editor organizes the order into tabs for order information, products, delivery, addresses, parcels and documents. It suits users who manage the detailed logistics of an order.
1. Select the advanced editor #
In My account → My profile, choose Advanced LOGISTICS, then click Save. Open your order.
To create an order, open Shipping process → Orders to process and click Input an order. You can also open an existing order from the list.
2. Navigate the tabs #
| Tab | Use |
|---|---|
| Order | References, status, customer message, currency and dates. |
| Products | Items, quantities and preparation information. |
| Delivery | Carrier, service level, label format, dates, values and instructions. |
| Addresses | Sender / warehouse and recipient details. |
| Parcels | Parcel references, weights, statuses, tracking and dates. |
| Documents | Shipment documents and available actions. |
An administration tab may appear for users with the relevant permissions. Its tools are not part of routine order entry.
3. Check the order and addresses #
In Order, check references, store and status. Read-only values provide context; complete editable information needed by your workflow, such as the customer message, currency or shipping deadline.
In Addresses, distinguish the Warehouse / sender section from the Customer delivery address. Check both ends of the shipment: company or name, address, country and contact details.
The customer address book is available directly during order entry. In the customer section, the magnifier opens Existing customer. Use the filters under Company, Name, Zip code or City, then select the customer to copy their details into the order.
For a new recipient, enter the company, first and last names, contact details and delivery address directly. For a business delivery, include the person or department that should receive the shipment.
The order and the customer record are saved separately. Editing contact or address details in the editor changes the order information. Click Save to keep the order changes. To also add to or correct the customer address book, click the disk icon next to the magnifier. A one-off delivery address can therefore remain specific to the current order.
Check the full address, zip code, city and country. The country code is an ISO code, such as FR. Enter a pickup-point identifier when required by the selected shipping service.
4. Complete the products #
- In Products, click Pick products to open the catalog.
- Search using the SKU, barcode or product-name filters.
- Review Available stock and tick the products to add.
- Click Add selected products.
- Check and adjust the ordered quantities in the order lines, then finish editing the line before saving the order.
Available stock already accounts for reservations. The catalog shows this availability without a warehouse breakdown. A blank value is not a confirmed zero quantity. Check availability before releasing the order for preparation.
A newly added catalog reference starts with a quantity of 1: replace it with the actual ordered quantity. If the reference is already in the order, adjust its existing line rather than relying on another selection to increase the quantity.
Alternatively, use Add row and enter the SKU, product name and quantity, followed by any details needed for your workflow, such as weight, EAN or lot reference. To remove an item from this order, select its row and click Delete selected row.
Depending on the displayed columns, the advanced editor also includes preparation instructions, country of origin, customs code, lot reference and dimensions. Complete the information needed for your workflow.
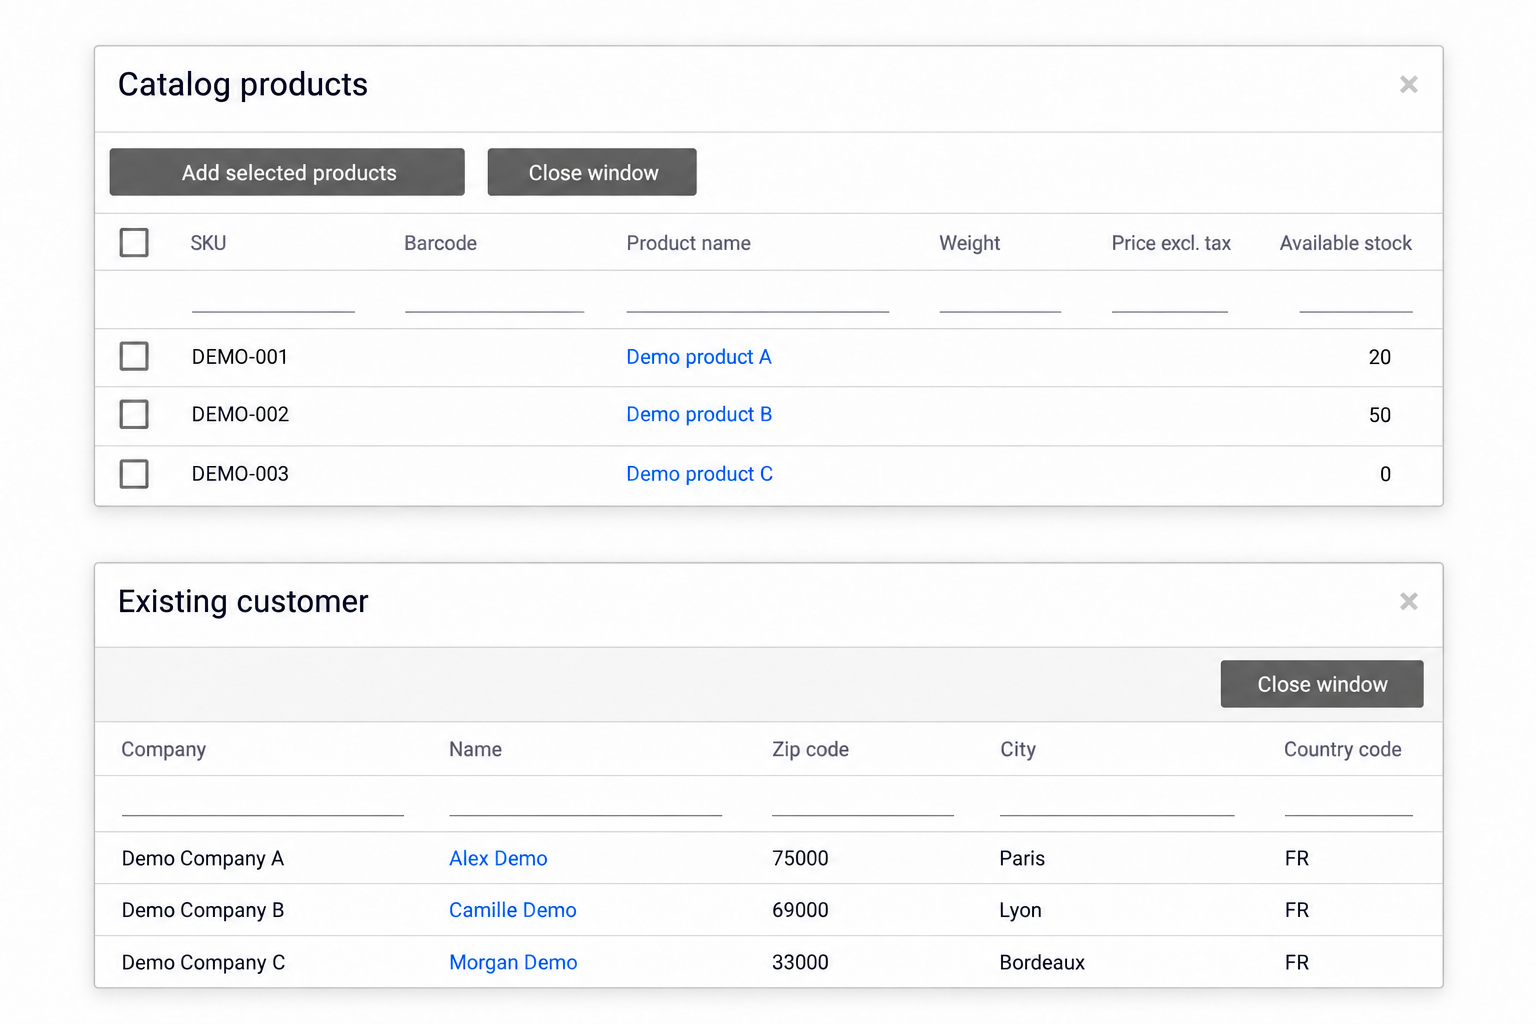
Illustration anonymized and adapted for this guide; Demo data is fictional.
5. Set up delivery #
First choose the Shipping service (carrier account), then the Product code for the required service level. The available product codes depend on the selected shipping service.
| Information | What to enter or check |
|---|---|
| Total delivery value / Insurance value | Shipment and insurance values as required by the selected service. |
| Weight unit | A unit consistent with the entered weights, such as kg. |
| Incoterm | The delivery term applicable to your shipment, when needed. |
| Delivery instructions | Useful receiving information: opening hours, access, contact or special instructions. |
In this tab, also check the Label format, Sender reference and relevant dates (deposit, shipping, delivery or requested delivery). Required values depend on the carrier and your workflow.
6. Review parcels and documents #
The Parcels tab shows shipment parcels, their references, weights, statuses, tracking numbers and shipping dates.
In Documents, click Upload document to attach a file. Choose its type: Invoice, Delivery note, Return note or Flyer. Select the file, add a reference if useful, and click Upload.
The list shows shipment documents with their type, creation date, format and reference. Use the display icon to open a document.
The Documents tab may also offer outbound and return label generation and delivery-document generation. Use these actions when the shipment is ready and its data has been checked, following your carrier workflow.
7. Save and release #
- Check the recipient, address, product references, quantities and shipping details.
- Finish editing the current product row, then click Save.
- If your workflow uses a warehouse management system (WMS), then click Send for preparation to release the order for warehouse processing.
Save does not send the order for preparation. Save your changes before releasing the order. Copy order lets you start from a similar order; review the resulting order details before using it.
Parcel tracking shows information as it becomes available: reference, status, weight, tracking number and shipping date. Some fields remain empty until the corresponding information has been produced.
Resync order and Change order status are separate actions. They do not replace saving your entry; use them only for the relevant operation.