
Configure your Dachser account in AtomicSeller: carrier access, service, label format and default sender.
1. Open the settings #
Open Shipping services, then double-click the Dachser service you want to configure. Have the credentials and settings supplied for your connection ready. The Demo values in the screenshot are fictional and must not be copied into your account.
Interface note: the observed Dachser form displays the heading Fedex Common settings. This is the label currently shown by the application. Identify the form by its Dachser logo and the Forwarder ID, Client ID (CONSIGNORID) and Client key fields.
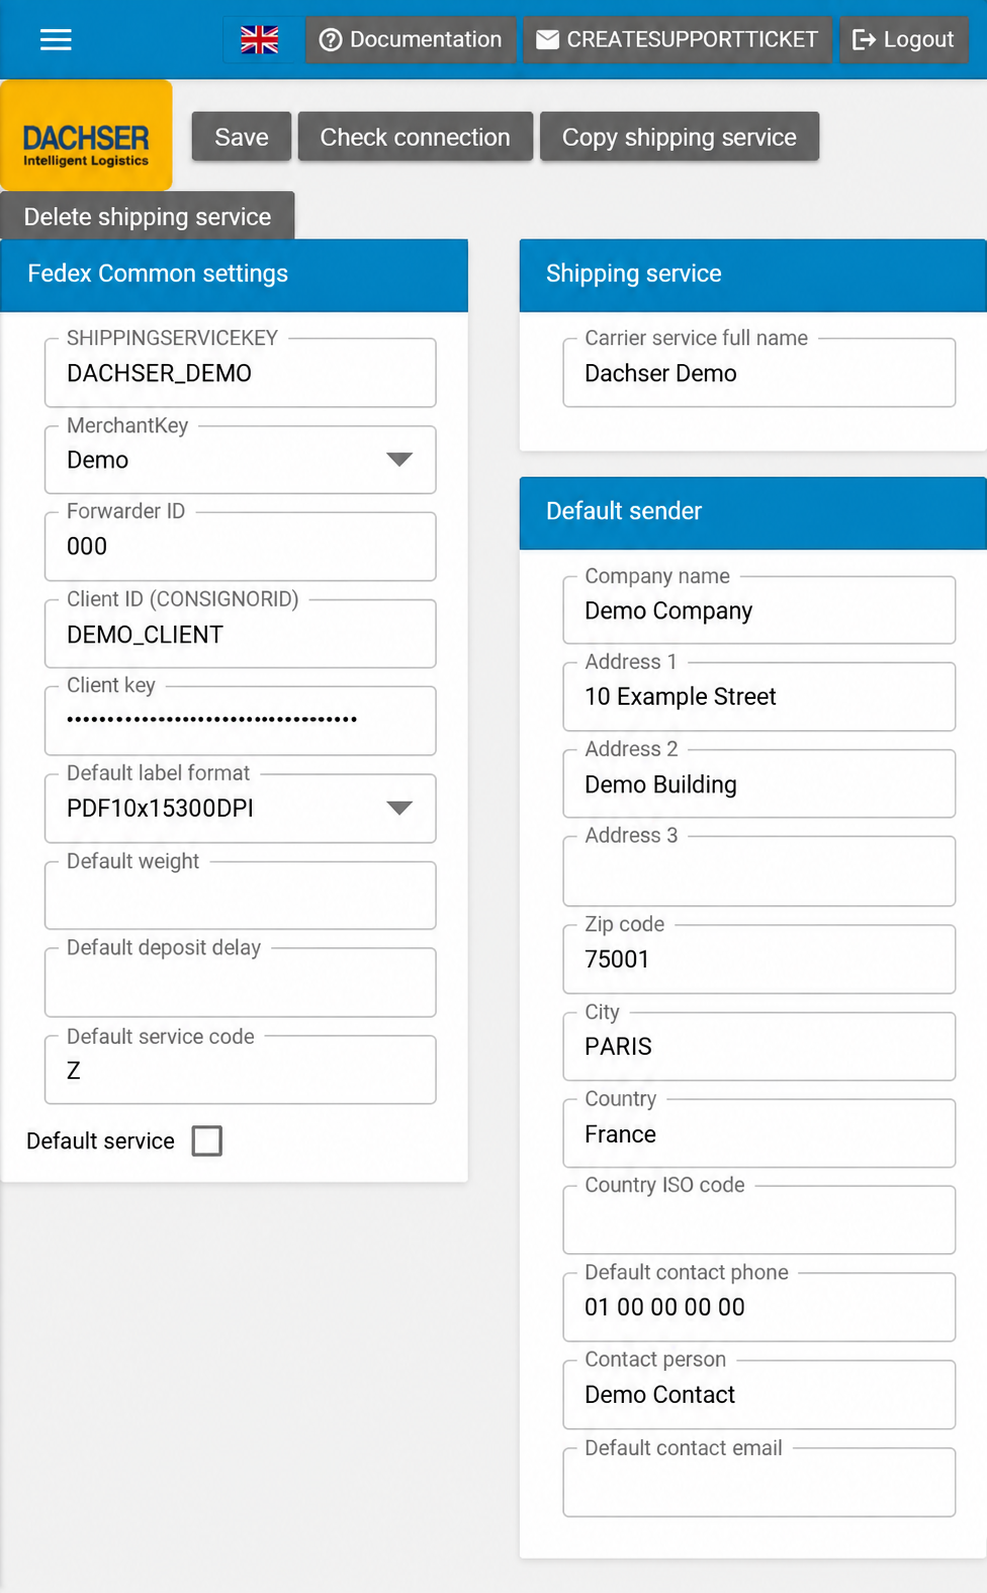
Screenshot edited to anonymise account data. Labels match the English interface. Example values and empty fields are not configuration recommendations.
2. Enter account and service details #
| Field | What to enter |
|---|---|
| SHIPPINGSERVICEKEY | Code identifying this service in AtomicSeller. Keep an existing code until you have checked its mappings in your orders and integrations. |
| MerchantKey | Merchant associated with the service. Choices depend on the merchants created in your account. |
| Carrier service full name | Name used to recognise the service within your organisation. |
| Forwarder ID | Forwarder ID supplied for your Dachser connection. |
| Client ID (CONSIGNORID) | Client / CONSIGNORID identifier supplied for your Dachser account. |
| Client key | Client key associated with your Dachser connection. This field is masked in the form. |
| Default label format | Label format suited to your printer and supported by your connection. |
| Default weight | Default weight. Confirm the unit and when the value applies to your connection before entering a value. |
| Default deposit delay | Default deposit delay. Use the value confirmed for your workflow; the label does not specify its unit. |
| Default service code | Text field containing the default service code. The observed example uses Z. Use the code confirmed for your contract; this is not a dropdown. |
| Default service | Select this checkbox if this service should be the default in your configuration. |
3. Choose options and label format #
Default label format #
- PDFA4300dpi
- PDF10x15300DPI
- ZPL10x15203dpi
- ZPL10x15300dpi
- ZPL10x10203dpi
- ZPL10x10300dpi
- DPL10x15300dpi
- DPL10x15203dpi
- DPL10x10203dpi
- DPL10x10300dpi
PDF10x15300DPI: a 10 × 15 cm PDF label at 300 dpi, suited to professionals using a printer for self-adhesive labels.
PDFA4300dpi: an A4 PDF suited to printing on A4 sheets, particularly for individuals or beginners.
The other choices serve more specific professional needs. ZPL and DPL require compatible equipment or a compatible printing workflow. Also check that your carrier connection supports the format.
MerchantKey #
The list depends on the merchants in your account. Select the relevant merchant; names from the account used for the screenshot are not reproduced here.
4. Complete the default sender #
Enter the default sender’s details in Default sender. They will be used when no sender is provided in the order or through the API.
| Field | What to enter |
|---|---|
| Company name | Sender’s company. |
| Address 1 | Street number and name. |
| Address 2 / Address 3 | Additional address details, if needed. |
| Zip code / City | Postal code and city. |
| Country / Country ISO code | Country and two-letter country code, for example France and FR. |
| Default contact phone | Sender contact’s phone number. |
| Contact person | Sender contact’s name. |
| Default contact email | Sender contact’s email address. |
5. Save and check the connection #
Click Save to save the settings, then Check connection to run the check provided by the application. If an error occurs, check the credentials, identifiers and service code. If needed, send the exact error message to AtomicSeller support without including passwords or access keys.