
Enter your Colissimo account credentials, choose your shipping label settings and complete your default sender details in AtomicSeller.
Before you begin #
Have your account number, user ID or contract number, and password for your Colissimo connection ready, along with your sender details. Use your own contract information: the “Demo” and “000000” values shown here are fictitious.
1. Open the Colissimo settings #
In the Shipping menu, open Shipping services, then open the Colissimo service you want to configure.
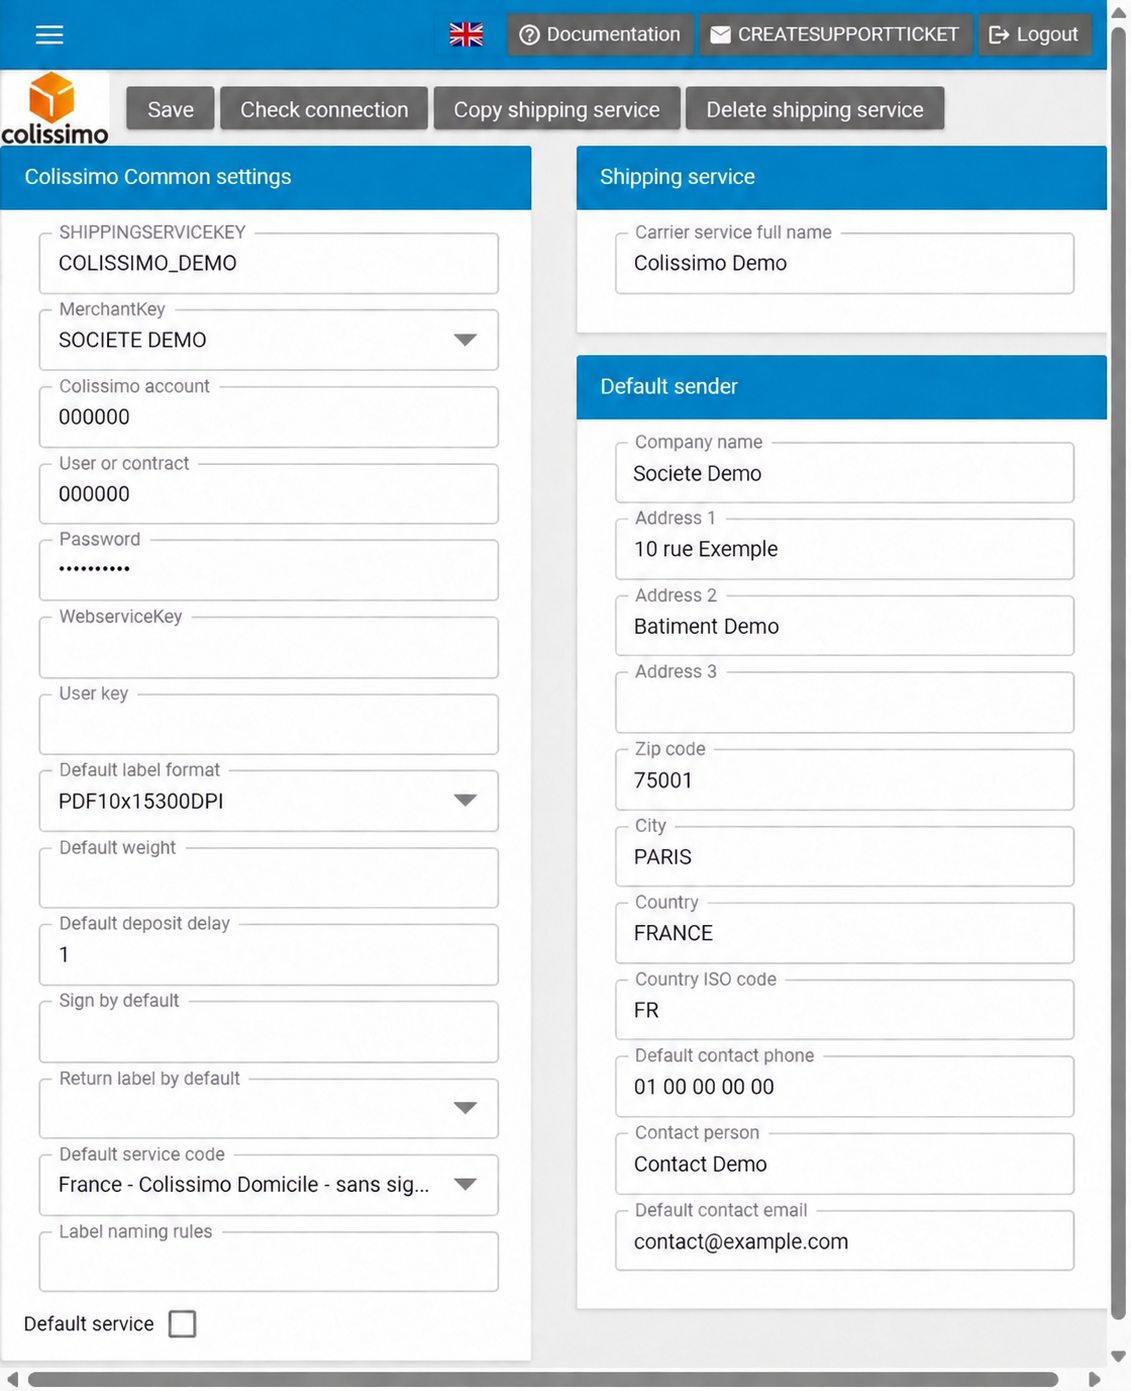
The field names below match the English interface shown in the screenshot.
2. Identify the shipping service #
| Field | What to enter |
|---|---|
| SHIPPINGSERVICEKEY | The code identifying your service in AtomicSeller, for example COLISSIMO_DEMO. For a service already in use, keep the existing code until you have checked how it is used in your integrations. |
| MerchantKey | The merchant to associate with this service, if your environment uses multiple merchants. |
| Carrier service full name | A name that helps you identify the service, for example Colissimo Demo. |
3. Enter your Colissimo credentials #
| Field | What to enter |
|---|---|
| Colissimo account | Your Colissimo account number. |
| User or contract | The user ID or contract number used for your Colissimo connection. |
| Password | The password associated with your connection credentials. Its contents are masked on screen. |
| WebserviceKey / User key | These fields are also available. Their use depends on the connection method: confirm which values your configuration requires before filling them in. |
4. Choose your label settings #
| Field | Purpose |
|---|---|
| Default label format | Select a format suitable for your printer. The two main choices are PDF10x15300DPI and PDFA4300dpi; see the explanations below. |
| Default service code | Select the service that matches your shipments and contract. The example shows France – Colissimo Domicile – sans signature (DOM) (home delivery without signature). |
| Default weight | Default weight field. The unit and the conditions under which it applies still need to be confirmed for this version of the application. |
| Default deposit delay | Default parcel handover delay field. The unit and the calculation of the handover date still need to be confirmed. |
| Sign by default | Default signature setting. The accepted values and how this setting interacts with the selected service still need to be confirmed. |
| Return label by default | Choose whether to generate an outbound label only, a return label only, or both. The three options are detailed below. |
| Label naming rules | Label file naming rules. The available syntax still needs to be confirmed before an example can be provided. |
| Default service | Checkbox used to designate a default service. The scope of this selection still needs to be clarified. |
Which label format should you choose? #
| Format | When to use it |
|---|---|
| PDF10x15300DPI | A PDF label measuring 10 × 15 cm, at 300 dpi. This format is suitable for professionals using a dedicated printer for self-adhesive labels. |
| PDFA4300dpi | A format for printing on an A4 sheet. It is suitable for individuals and beginners, as well as return labels intended for individual customers. |
| Other formats (ZPL and DPL) | These formats are used less frequently, for the needs of certain professional users. |
Should you generate a return label? #
| Return label by default option | Result |
|---|---|
| Blank option | Only an outbound label is generated. This is the most common choice. |
| Return label only | This Colissimo account produces return labels only, with no outbound label. |
| Both go and return label | Both an outbound label and a return label are generated. Place the return label inside the parcel so the end customer can use it to return their shipment. |
5. Complete the default sender details #
Under Default sender, enter the default sender details. This sender will be used if no sender is specified in the order or provided through the API.
| Field | What to enter |
|---|---|
| Company name | The sender’s company name. |
| Address 1 | Street number and street name. |
| Address 2 / Address 3 | Additional address details, if needed. |
| Zip code / City | The sender’s postal code and city. |
| Country / Country ISO code | The country and its two-letter country code, for example FRANCE and FR. |
| Default contact phone | The sender contact’s phone number. |
| Contact person | The sender contact’s name. |
| Default contact email | The sender contact’s email address. |
6. Save and check the connection #
Use Save to save the settings. Use Check connection to run a connection check.
If the check fails, note the message displayed and verify that the account, user ID or contract number, and password match. If necessary, send the error message to AtomicSeller support without sharing your password.